
![IMG_0162[1]](https://dgpaints.wordpress.com/wp-content/uploads/2016/01/img_01621.jpg?w=474)
Today I’ll show you how to make my palette (pictured above). I first made it out of necessity and I’ve had a lot of people ask about it. With a little know-how and some tools you can make this palette very inexpensively. I made mine for about $10. Granted, I have some necessary tools, but the materials themselves are quite inexpensive.
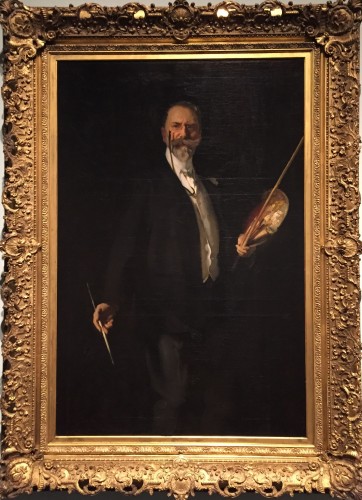
I had always been a hand-held-palette-man. Of course, right? I mean how are you going to look like a cool artist with a table top glass palette? I’ve always loved this painting of William Merritt Chase by John Singer Sargent. I mean, without the palette in this picture, you just have a stuffy member of the bourgeoisie. THIS is the classic artist look I wanted. Minus the swanky suit, of course.
Alas, it was not to be. About a year ago I started to experience some neuropathy in my neck. This injury was caused by the repeated motion of looking down at my palette, looking up again, looking down at my palette, looking up again, looking down– you get the picture. So I had to look for a solution.
Actually the solution was already in my mind BEFORE my injury. I had been thinking of making a free standing adjustable palette for a year or two. Well, now I HAD to make one. So I did. The free standing palette did two things for me to relieve my injury and allow me to heal while still working.
- The repetitive down-up-down-up motion of my head and neck stopped.
- I could now change the location of my palette so as to prevent any other similar injuries. Some days I put the palette on my left. Other days on my right.
The materials you will need:
-1/4 inch medium-density fiberboard (MDF) panel size 12×16 (or desired size. But don’t make it too much bigger)
-4×4 inch piece of 1/2 inch hardwood plywood
-one 1/4-20 x 5/16 T-nut
-A camera tripod on which to mount your palette. My (ex-) wife found an older but very serviceable tripod at a garage sale for $1. Score!
Tools I used:
-Jig saw
-hand held electric sander with 150 grit sand paper
-hammer
-wood glue
-taupe colored spray paint
-2 inch wide varnish brush
-Bullseye Shellac
-320 grit fine sand paper
Here’s how I made my palette:


1. With a jigsaw I cut a 12×16 inch panel from a larger 1/4 inch MDF sheet . I rounded the top edge to give it a more pleasing look. I also beveled the corners with a hand held electric sander.


2. From a larger piece of half inch 5-ply hardwood plywood, I cut a 4×4 inch square for the tripod mount base. I beveled the corners on one side of this with a sander. I drilled a hole in the center of this to fit a 1/4-20 x 5/18 T-nut, which is to screw into a tripod mount. The size of the T-nut is very important as it must fit the tripod mount screw exactly. I recommend testing it first (as shown in the photo).


3. On the unbeveled side of my 4×4 inch plywood square, I inserted and embedded the T-nut by pounding it in with a hammer. Make sure the top flange surface of the T-nut is flush with the surface of the plywood.


4. I then glued the 4×4 plywood piece to one side of the main palette panel with wood glue. Make sure you glue the plywood FLANGE SIDE DOWN. When glued you should only see a round hole looking at you from the plywood. I set this aside for a day with a weight to make sure the bond was secure.
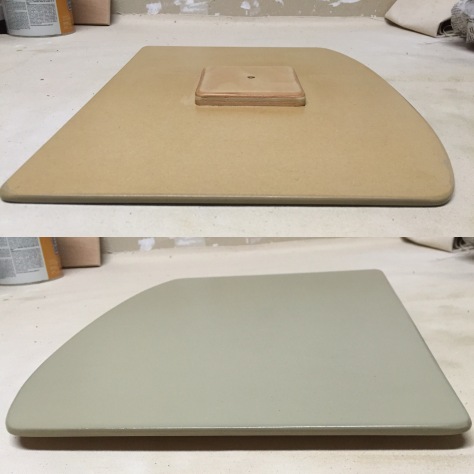
5. The rest is easy. I spray painted my palette on the top side with a taupe/gray color that I found pleasing — a nice warm neutral on which to mix my colors. I sprayed on 2 or three coats, sanding lightly with fine grit sand paper in between coats. Once the paint was dry I applied two coats of shellac with a varnish brush to the underside of the palette. Let each coat dry thoroughly before applying the next. Once the underside of the palette was done I added 3-4 coats of shellac to the top side; again, sanding lightly between coats with fine grit sand paper. Note: I did not use an electric sander for the sanding on this step. I just held the sand paper in my hand and pressed the paper into the surface lightly with the pressure of my fingers.
The shellac is necessary for two reasons. First, MDF will blister and warp badly upon contact with moisture. The shellac seals the surface. Second, it makes a nice glassy surface which I find very nice to mix my paints on. It is also impermeable to turpentine or mineral spirits, so the palette surface is easily cleaned if desired after each painting session.
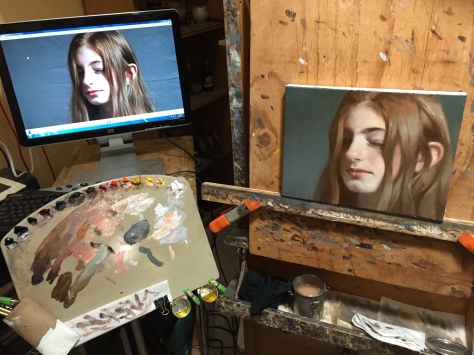
Here is a typical scene in my studio on any given day. You can see I like to clip various things to my palette: mediums, a paper towel, and an old cardboard cylinder that holds brushes, too! So, my palette is easily “customize-able” as I see fit. Maybe it ain’t pretty, but it works perfectly.
For anyone who would like a free standing palette but is ill-equipped or disinclined to make one yourself I can offer one option that I know of. Artist David Kassan has invented what he calls the Parallel Palette. If you don’t need a very large mixing area (DK’s has an 8×8 inch mixing space) the Parallel Palette may be for you.
I was also reminded just recently that a music stand may be employed for this purpose as well. You can secure a disposable or glass palette to this for an inexpensive alternative.
Best wishes and happy painting!!
DG

Hi , Thank you so much for the useful information on how to make your palette. Very helpful.
Vimala Arunachalam
Sent from my iPad
>
LikeLike
Hi just wondering what oil paint brands do you use or recommend.
LikeLike
I prefer M. Graham paints. I recommend a professional grade paint that suits your touch. Some paints are softer, some are more stiff. Graham paints have a soft creaminess I like. I don’t prefer stiff or thick paints.
LikeLike
Thanks for getting back to me yoyr style is more alla prima correct!! I love your style and am trying to figure out the way you do it as opose to underpainting. Just looking at different options on how to achieve realism in my work.
LikeLike
I paint both alla prima and indirectly. Eventually I will present more instruction and notes on how I paint. Good luck!
LikeLike
Great thanks man!!!
LikeLike
Very nice, except for people like me who use large gobs of paint. Answer is to have two of these palettes, one on each side. Also a nice additional touch would be to have a small ledge at the bottom. Thanks, will try it.Jackie LeeSonoma, CAWebsite (oil paintings) JackieLeeArt.com
Right. It’s probably not the best thing for artists who work very large or “gobs” of paint.
LikeLike
Hi David,
Tank you very much, I like your shoos too….
Armando. >
LikeLike
Very nice! I have postponed doing something similar to this for some time now. One of the other reasons I personally wanted to do something like this, is the “information loss” I sometimes experience after looking away, looking back, etc. With the palette closer to the site-line, it’s more of just an eye shift than a full mechanical motion of the head when comparing what’s on the canvas to what’s on the palette. Nice Post!
LikeLike
Hi David,
Nice post. I did admire your palette in class 😉
Another low- cost, low-effort option, is to use a music stand with a paper palette (Iâm lazy and donât like scraping the palette down). I stole one from my husband that heâd picked up on musiciansfriend.com for only $13 on sale. This is the one , only $18.99 right now.
I rig it out similar to you (I stole your cardboard tube idea a while back).
Best,
Margret McDermott
LikeLike
Yes, a music stand can work well, too!
LikeLike
Thanks ! I have a music stand. I will try it out !!!
LikeLike
David,
This is great stuff!
After seeing how well your palette worked in Los Gatos I was inspired to make my own. But instead of using the jig saw on some MDF I used a 12 X 16 inch canvas board, 3/8 inch thick, that I happened to have, also made of MDF, left the edges as they came and covered the surface with a piece of plastic I purchased from a local store, Tap Plastics, that specializes in unique plastics. They suggested a new product that is part plastic, part glass and cost about $18 for the 12×16. It is about 1/8 inch thick and has a thin layer of glass on the surface of the plastic sheet which doesn’t scratch easily like plastic. When I paint, I place a piece of gray paper on the board and the plastic sheet goes on top of that. Everything is clamped together at each corner using strong alligator type clamps like the ones you show in your photos. As you suggested, I use the clamps to also hold paper towels and medium cups. When I’m finished painting I can simply scrape off the paint or just place the plastic sheet in a palette box to save for later the same day.
As always, thanks for teaching us not only how to paint better but how to lead a more effective life in the studio!
Your workshop was inspiring in many ways!
Cheers,
Dennis
LikeLike
Great to hear from you, Dennis. Your system sounds terrific! I hope all is well with your painting. All the best!
LikeLike
muchas gracias , solo los grandes maestros comparten sus conocimientos!
LikeLike
You’re welcome!
LikeLike
Hey David,
I love your you free standing palette!!! (I was about to spray paint a handheld palette). What a great idea… as mentioned in the comments, it gives you a way to best compare with the colors in the model, keeps other necessary tools handy and frees your hands to paint. I’ll bet you get less paint on your clothes than with a handheld palette.
The color you painted it is more my preference as I use a warmer gray than most other artists. I either use raw Senso linen or paint a piece of canvas with raw umber and white to go under glass or plexi for travel. What brand and specific color of spray paint did you use? Does it stain or can the residual color be wiped off? Can you use alcohol to clean it?
You may like this brush holder I found. I plan to order one, but haven’t tried it yet. http://easelbrushclip.com/offer
The palette could be made to fit in a French Easel box, for those of us to bring our own easels to life painting sessions. Or just screw on the mount you describe with the palette that comes with the easel.
I like your free standing easel idea better than a music stand… more secure and adjustable. Though a small ledge on the bottom may be a good idea. As for music stands we have a few of those around the house. My husband and brother are the founders of Musician’s Friend… my parents the founders of Guitar Player Magazine and Musician’s Supply (predecessor to MF) as well as Guitar Showcase in San Jose, Ca. We grew up in the Music Business. It was fun to see MF referenced in the comments
Thanks for your useful, practical posts.
Sheri
LikeLike
thank you for the info…very clever.
Date: Sun, 31 Jan 2016 03:56:49 +0000 To: htvon@hotmail.com
LikeLike
I think artists are such ingenious individuals. You have just proven my point! I have a music stand that needs dusting off. I think I’ll somehow blend the two ideas! ❤️
LikeLike
Hi Dee! Nice to hear from you! Good luck!
LikeLike
Thank you very much for your advice and the information to make the palette.
You are a complete master that have no problems to share your experience and knowledge.
It’s perfect for me.
All my best and greetings from Monterrey. Mexico.
LikeLike
My pleasure.
LikeLike
thank you very much very interesting ciao from Italy
LikeLike
When you come to do a workshop in Italy?
LikeLike
Hi. Next year I plan to be in Rome!
LikeLike
Hi David, when you do your next tutorial video is it possible to get a second camera to simultaneously show what’s happening on the palette as you paint on the canvas? I’m following along and learning from your videos at home but am struggling a bit on mixing colours so would love to see how you do it!
LikeLike
Hi Emma. It’s not possible at the moment. Sorry. I have plans for this possibility later. But we will have to wait a little.
LikeLike
David, first time here, very impressed by your technique! I want to practice after your instructions. About your standing palette, I have a (probably stupid) question: Won’t the paints/mediums run if you incline it? and if so, what is the solution?
Gilberto Mello
LikeLike
Hi Gilberto. No, it does not run. Oil paint has a certain viscosity to it. It won’t run down the palette. Best wishes, DG
LikeLike
No. The paint won’t run.
LikeLike
This is a great idea! You solved a problem I didn’t realize I had. I have a nice floor easel that I don’t use enough because the table I rest my palette on is short and the transition is awkward. I’ll have to modify the design to hold a glass palette but will be simple and I already have a tripod.
LikeLike
hi david, I need to know what colors you prepare before painting, can you send me a photo or your palette of portraits?, I wish to learn some of your beautiful tecnique.
LikeLike
Yes. I can do that.
LikeLike