Workshops are Worth It!

IMG_6605
Giving a demonstration in Belfast, Northern Ireland.

Hi Gang! I know it’s been a long time. But I’m BAA-aaaaack! Today I want to talk about the value of taking workshops when there are so many great tutorials out there (DVDs, Youtube, etc…).

So… why invest hundreds of dollars and many hours to attend a live workshop when you can simply pick up the latest tutorial DVD by your favorite artist/teacher at a fraction of the cost? Hey, I get it. For many of us it’s just not possible to attend a class for many reasons: scheduling conflicts and lack of expendable income are probably the two most common reasons why people cannot make the investment. And for you, this is why I made my tutorial DVD with Bella Muse Productions. But I want to give some reasons why you should still consider signing up for a workshop. This is not an exhaustive list:

362e86_50ffb89bc9344211968f4568bd604005
Students hard at work in Bruges, Belgium at Flemish Classical Atelier.

The Live Experience — There’s nothing like being in the same room with people of your same stripe working toward a common goal. Being in a new place with new people has a way of heightening our senses. We are able to consume the learning process in a special way that deepens the experience and makes it more meaningful. The energy is palpable. We undergo the adventure together. We find we are not alone in our frustrations and victories, and how lovely is that?

Interfacing with your Instructor — I can almost guarantee you that you will be surprised by your teacher. How nice they are. How mean they are. How they breakdown and present the material. You will no doubt go to the class with certain misconceptions about who this person is and how they will operate. Be open minded. Even well-known artists are only human and we have our weaknesses and foibles (Well, not me, of course. I’m speaking of the other guys. Wink.). We also have our unique strengths. We have a lot to teach you just by the attentive way in which we approach our subject, how we manage our materials, and simply our posture while making our art.

14424768_1360465633994127_5416219680288739518_o
A full class at Los Angeles Academy of Figurative Art.

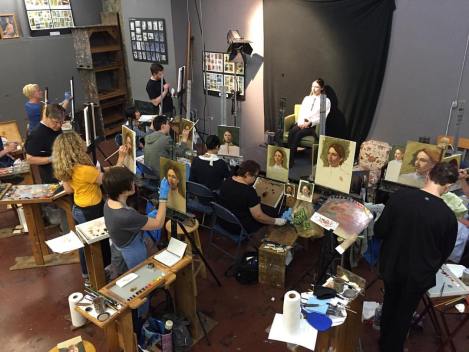
Personal Attention — In a DVD you don’t get the personal attention. You don’t get the critiques. Also, you don’t get to hear the teacher critiquing other students. These indirect comments may very well apply to your work, too. In my classes I strive to give each person equal attention. I don’t play favorites and my goal is to help you learn and improve. If you aren’t able to make a “fix” I will literally take your brush in hand and make it (or part of it) for you. In many, many cases my students are surprised by the way I am able to redeem a seemingly hopeless situation. This is a very important service you will never receive from a DVD tutorial. I love to demonstrate to my students that once you acquire the proper tools, nothing is impossible.

Making Friends — I have made most of my very best friends in the line of teaching. My worldview has greatly expanded and I’ve met such wonderful people who have added beautifully to the quality of my life. Of course you may not meet your “bosom pal” at class, but you just never know.

1234642_10202981636372387_1340386743_n
Lots of smiles at the end of a great workshop in Brattleboro, Vermont.

So think about it and don’t set your default button at “I can’t afford it”, or “I’m waiting until I win the lottery”. Take the first step and start calculating costs. Save up if you need to and make a plan. Just do it! I’ll be waiting for you. You won’t be disappointed.

My 2018 workshop schedule can be found HERE. We also have some space open for my portrait class in Seattle coming VERY soon, January 22-25. Details can be found on my workshop schedule.

Happy Art Making!

David

photo group 3


2017 Workshop Schedule and…DVD!

Hi Everyone! I just wanted to announce that my new tutorial DVD on painting the portrait is now available from Bella Muse Productions. You can purchase a physical DVD or if you prefer you can download it.

In this 6 hour tutorial I cover every step of my typical process from the initial underdrawing to final glazes. My palette is visible on the screen while I’m painting, so you can see what I’m mixing. Of course, I discuss my colors and other factors that go into my color mixes. I hope you’ll be pleased with it. I don’t hide anything.

If you buy now you can save about $50 off the normal purchase price (NOTE: This deal is now expired). Click HERE to purchase.

Also — my 2017 workshop schedule is now available. I’ll be in Europe several times as well as on both coasts of the US. View my schedule HERE.

Happy painting!

DG

Preparing Dibond Panels with Shana Levenson

sibling-bond
Sibling Bond, 36×24, Oil on Dibond panel by Shana Levenson

What is Dibond? Dibond is one of several trade names of aluminum composite consisting of two thin sheets of aluminum enclosing a polyethylene core. Suitable for a huge range of applications, Dibond is lightweight but strong and the extremely flat surface is great for printing high quality graphics or text. More and more painters seem to have found this material ideal as a painting substrate. The prevailing argument for the use of Dibond is it’s presumed stability over a long period of time. With Dibond you don’t have to worry about the organic fibers rotting (as with cotton and linen), and you don’t have to worry about warpage (as you do with any kind of wood panel). The expansion and contraction of these organic materials, which over many years may compromise the integrity of the paint film, also becomes a non-issue with Dibond.

As with any other substrate, Dibond needs to be prepared to accept oil paint (or any other traditional media, I suppose). As I am a total Dibond newbie I have asked my friend, artist Shana Levenson, to outline the process she uses to prep the surface. Thank you, Shana, for providing the following instructions and photos:

SUPPLIES NEEDED:

Dibond or Aluminum Panel
Exacto Blade
Straight Edge
Liquitex Acrylic Grey Gesso
Spray bottle
Sponge brush
Electric Hand Sander
200 and 400 girt Sand Paper

13225241_10208566427975033_1073636120_o

PREPPING THE DIBOND:

Sand the bare aluminum with the hand sander and 200 grit sand paper
Spray the surface with water to help the gesso brush out evenly
Squeeze gray gesso onto panel
Spread with the sponge brush with even brush strokes
Let dry

13234814_10208566428375043_1727578414_o

Repeat these steps twice more, brushing the gesso in opposite directions each time.

13223678_10208566428655050_1850180060_o13230936_10208566428695051_1916605641_o

By spraying water for each new layer, it allows the gesso to go on more evenly to avoid line texture.
Once the last layer is dry, take a fine grit sand paper and either hand sand it in circles, or with a sander, until you reach your desired smoothness.

13224150_10208566428895056_785000703_o

CUTTING DIBOND:

Measure the size wanted and make marks where to cut.
Lay a straight edge firmly down where the desired measurement is.
Make sure when doing this, you are using a flat surface to avoid bending the aluminum panel.
Continuously score the dibond against the straight edge with a razor blade. Depending on the size, you can either stand it while bending it back and forth to snap off, or put the dibond on a table and push down the cut piece on the edge of the table.
Once cut, the sides can be sharp so use a tool to shave down those sharp sides.

13214963_10208566428615049_1428447455_o

To obtain some Dibond panels, Shana recommends getting in touch with a local commercial sign maker. They may even cut and deliver for a nominal charge.

Thank you Shana! I look forward to using this technique to prep my first batch of Dibond panels.

Shana Levenson is a representational painter from Albuquerque, NM. Shana’s work focuses on portraiture and the figure. Her inspiration comes from painting people that are important in her life, and her goal is to capture each person’s story in an honest and meaningful way. Shana draws inspiration from her own experiences and uses specific series as a way to illustrate chapters in her life. Her works can be seen in regular exhibitions across the United States and abroad.

Find out more about Shana and see her work at ShanaLevenson.com. Shana is also a co-developer of Art Crit Academy, an online mentorship program for serious art students and those seeking a career in art. Find out more at ArtCritAcademy.com.

13288090_10208626513797141_688008970_o

Needs Must…

  
Most of you know my view on projecting a photographic image for the purpose of painting. If you don’t, you can read about it HERE.  In general I’m not in favor of it. It’s normally a point of honor for me to hand-render my images whether I’m working from life or from photos. However, there are times when “needs must”. I’m going to be a little vulnerable here and admit that the nature of my current deadlines necessitate the use of a projector in order to save a couple of hours time. We’ll have to see if I can pull this off. 

Stand by…

PS- I want to stress that if you use a projector YOU MUST ALREADY BE A GOOD DRAFTSMAN in order to make a fine painting. If you still can’t draw well the projector won’t save you. Trust me.

Everything is Relative

  
If you paint region by region as I do, make sure you’re aware that each individual object is part of a larger whole. The learning painter is often so detail oriented that he easily loses sight of this fact. One must constantly shift one’s focus from macro vision to micro vision and back again. These iPhone pics of my current work-in-progress (WIP) demonstrates how I paint a bit of the surrounding areas to give me a better context for finishing the more important elements. 


Note: this is just the complete overpainting. There will be some glazing applied later which will add richness and subtlety to the color. 

Finished and Framed. Ready for shipping.

In Honor of the Dead

  
Today I’m rushed. I have a deadline. I don’t have the time I really would like to give my paintings. I have a show planned for May. Yet my mind is calm as I get into the paint. I begin my dance with brush and panel. I settle into the familiar and delicious feel of the paint as I mix the colors with my brush. I feel the indescribable contentment that comes from the oneness I have with my materials. I find the forms of my observed subject as I apply stroke after stroke. An unconscious rhythm evolves and I hope the result will be the creation of something that has meaning for at least one other person. 

5000 miles away a mother weeps for her dead son. A daughter prays for her injured father. Friends grieve their common loss. Beasts of destruction congratulate themselves. (I have a friend who tells me “evil does not exist”. I don’t understand this notion.)

Today I rush, painting as fast as I can in a kind of controlled desperation. I live in my calling. Tomorrow I might be dead.

How to Make My Free-Standing Palette

IMG_0162[1]
Demonstrating an alla prima portrait at Flemish Classical Atelier in Bruges, Belgium
Hi Gang,

Today I’ll show you how to make my palette (pictured above). I first made it out of necessity and I’ve had a lot of people ask about it. With a little know-how and some tools you can make this palette very inexpensively. I made mine for about $10. Granted, I have some necessary tools, but the materials themselves are quite inexpensive.

I had always been a hand-held-palette-man. Of course, right? I mean how are you going to look like a cool artist with a table top glass palette? I’ve always loved this painting of William Merritt Chase by John Singer Sargent. I mean, without the palette in this picture, you just have a stuffy member of the bourgeoisie.  THIS is the classic artist look I wanted. Minus the swanky suit, of course.

sargent.chase_-362x500

Alas, it was not to be. About a year ago I started to experience some neuropathy in my neck. This injury was caused by the repeated motion of looking down at my palette, looking up again, looking down at my palette, looking up again, looking down–  you get the picture. So I had to look for a solution.

Actually the solution was already in my mind BEFORE my injury. I had been thinking of making a free standing adjustable palette for a year or two. Well, now I HAD to make one. So I did. The free standing palette did two things for me to relieve my injury and allow me to heal while still working.

  1. The repetitive down-up-down-up motion of my head and neck stopped.
  2.  I could now change the location of my palette so as to prevent any other similar injuries. Some days I put the palette on my left. Other days on my right.

The materials you will need:

-1/4 inch medium-density fiberboard (MDF) panel size 12×16 (or desired size. But don’t make it too much bigger)

-4×4 inch piece of 1/2 inch hardwood plywood

-one 1/4-20 x 5/16 T-nut

-A camera tripod on which to mount your palette. My (ex-) wife found an older but very serviceable tripod at a garage sale for $1. Score!

Tools I used:

-Jig saw

-hand held electric sander with 150 grit sand paper

-hammer

-wood glue

-taupe colored spray paint

-2 inch wide varnish brush

-Bullseye Shellac

-320 grit fine sand paper

Here’s how I made my palette:

1. With a jigsaw I cut a 12×16 inch panel from a larger 1/4 inch MDF sheet . I rounded the top edge to give it a more pleasing look. I also beveled the corners with a hand held electric sander.

2. From a larger piece of half inch 5-ply hardwood plywood, I cut a 4×4 inch square for the tripod mount base. I beveled the corners on one side of this with a sander. I drilled a hole in the center of this to fit a 1/4-20 x 5/18 T-nut, which is to screw into a tripod mount. The size of the T-nut is very important as it must fit the tripod mount screw exactly. I recommend testing it first (as shown in the photo).

3. On the unbeveled side of my 4×4 inch plywood square, I inserted and embedded the T-nut by pounding it in with a hammer. Make sure the top flange surface of the T-nut is flush with the surface of the plywood.

4. I then glued the 4×4 plywood piece to one side of the main palette panel with wood glue. Make sure you glue the plywood FLANGE SIDE DOWN. When glued you should only see a round hole looking at you from the plywood. I set this aside for a day with a weight to make sure the bond was secure.

GRRY4121

5. The rest is easy. I spray painted my palette on the top side with a taupe/gray color that I found pleasing — a nice warm neutral on which to mix my colors. I sprayed on 2 or three coats, sanding lightly with fine grit sand paper in between coats. Once the paint was dry I applied two coats of shellac with a varnish brush to the underside of the palette. Let each coat dry thoroughly before applying the next. Once the underside of the palette was done I added 3-4 coats of shellac to the top side; again, sanding lightly between coats with fine grit sand paper. Note: I did not use an electric sander for the sanding on this step. I just held the sand paper in my hand and pressed the paper into the surface lightly with the pressure of my fingers.

The shellac is necessary for two reasons. First, MDF will blister and warp badly upon contact with moisture. The shellac seals the surface. Second, it makes a nice glassy surface which I find very nice to mix my paints on. It is also impermeable to turpentine or mineral spirits, so the palette surface is easily cleaned if desired after each painting session.

IMG_2420

Here is a typical scene in my studio on any given day. You can see I like to clip various things to my palette: mediums, a paper towel, and an old cardboard cylinder that holds brushes, too! So, my palette is easily “customize-able” as I see fit. Maybe it ain’t pretty, but it works perfectly.

For anyone who would like a free standing palette but is ill-equipped or disinclined to make one yourself I can offer one option that I know of. Artist David Kassan has invented what he calls the Parallel Palette. If you don’t need a very large mixing area (DK’s has an 8×8 inch mixing space) the Parallel Palette may be for you.

I was also reminded just recently that a music stand may be employed for this purpose as well. You can secure a disposable or glass palette to this for an inexpensive alternative.

Best wishes and happy painting!!

DG

2016 Workshops!

IMG_0325.JPG

Hi Gang!

My 2016 Workshop Schedule is now finalized and can be viewed here: http://www.davidgrayart.com/#!workshops/cdq3. Overseas venues include: France, Belgium, Ireland. And in the United States: California, Georgia, Vermont, and Washington. I will not be adding any more workshops to the 2016 schedule. I hope something works out for you. Specific questions regarding costs and other logistics should be directed to the hosting studio. Contact information is available for each workshop.

See you in class!

DG


Second Periscope Feed on Monday

  
Hi Everyone,

We will have another Periscope broadcast on Monday, November 16 at 10:30 am Pacific Time. I will be teaching about glazing. Hopefully we will be able to improve the quality of the video from last time. Thanks so much for the feedback! 

If you are unable to watch the broadcast in real time, the feed will stay live for 24 hours. To see this Periscope broadcast please follow https://www.periscope.tv/nettycary which is the hosting studio of my workshop. 

This is an interesting technology. I hope to learn as I go and improve as I learn. I appreciate the suggestions. 

See you Monday!

DG

Periscope Broadcast Tomorrow

  
Hey Everyone,

I am currently teaching a still life workshop at Whisbey Island Fine Art Studio. Tomorrow, Saturday November 14 at 10:30am Pacific Time we will be broadcasting my demo of The Overpainting on a portion of my still life demonstration piece. Please follow https://www.periscope.tv/nettycary to tune in. This is my first experience with Periscope so I hope it all goes well. For those of you who cannot attend a workshop this will be a unique opportunity for you to get a “look in” to one of my classes. 

Sorry for the late notice. Please comment and let me know what you thought of it. 

Best wishes,

DG

Tips, lessons, and other musings on the art life